
Why Use This Feature
For many stores, verifying ID is a mandatory step before a vehicle is shown. Standard AVA® ID returns what is printed on the ID — name, address, and date of birth — but no way to reach the person afterward.
ID Plus Contact adds one step to the front of the verification flow that collects a phone number and email address. The completed verification arrives in the AVA® Portal as a contactable lead.
Who Should Use This
This workflow is recommended for:
- Sales staff verifying ID before a test drive or vehicle walkaround.
- BDC and reception teams checking in walk-in customers.
- F&I and business managers who need a verified, contactable record on file.
Before You Start
Make sure:
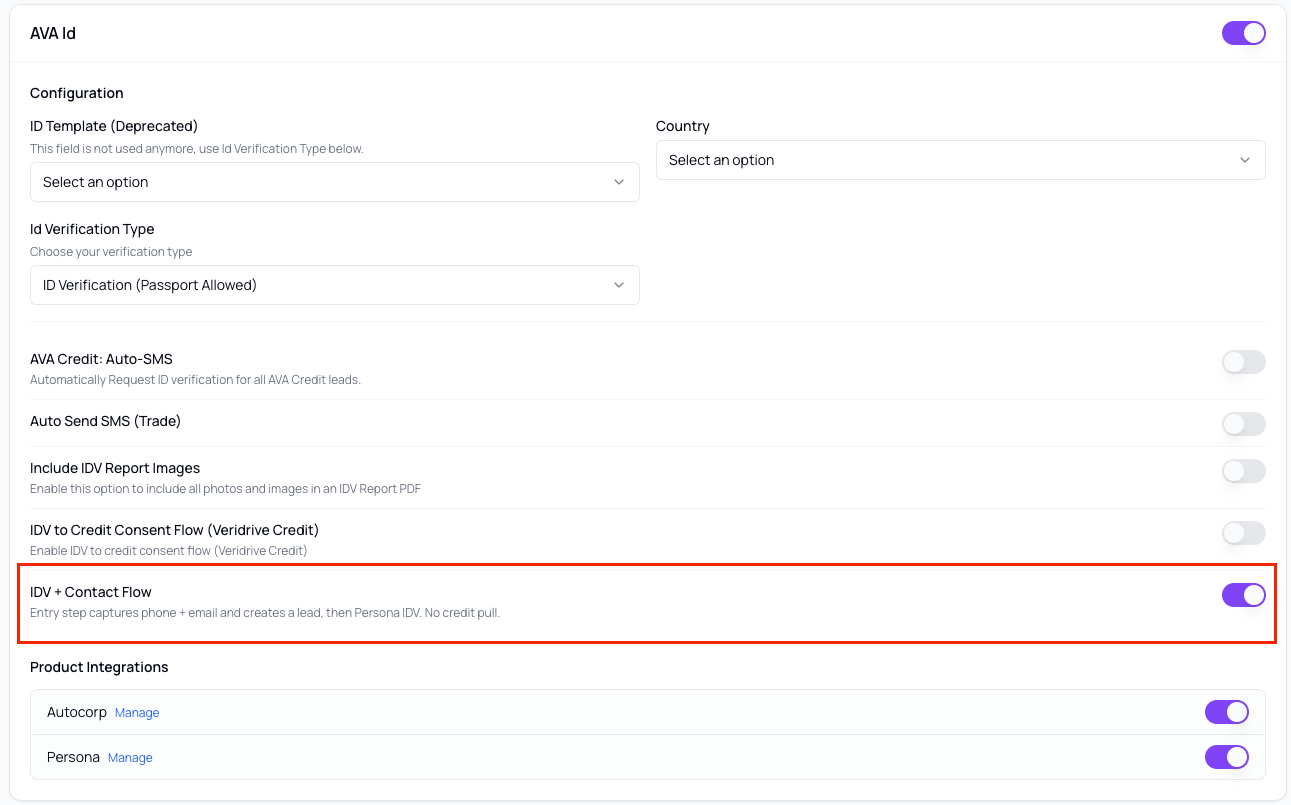
- Your store is enabled on the IDV + Contact Flow variation of AVA® ID. Your Autocorp.ai representative sets this on your company profile.
- Your default ID verification template is the one you want to use — the standard scan and selfie steps follow whichever template your store is already configured for.
- Your team knows how they will follow up, since the point of the feature is what happens after the verification.
THREE AVA® ID VARIATIONS
Standard ID Verification — scan and selfie only.
ID Plus Contact — scan and selfie, plus phone and email.
ID to Credit (VeriDrive) — identity verification carried through to a credit outcome.
Workflow
Step 1 — Send the verification request
Send the ID request link by SMS or email, or hand the customer a QR code to scan with their phone. This is unchanged from standard AVA® ID.
Step 2 — The customer enters their contact information
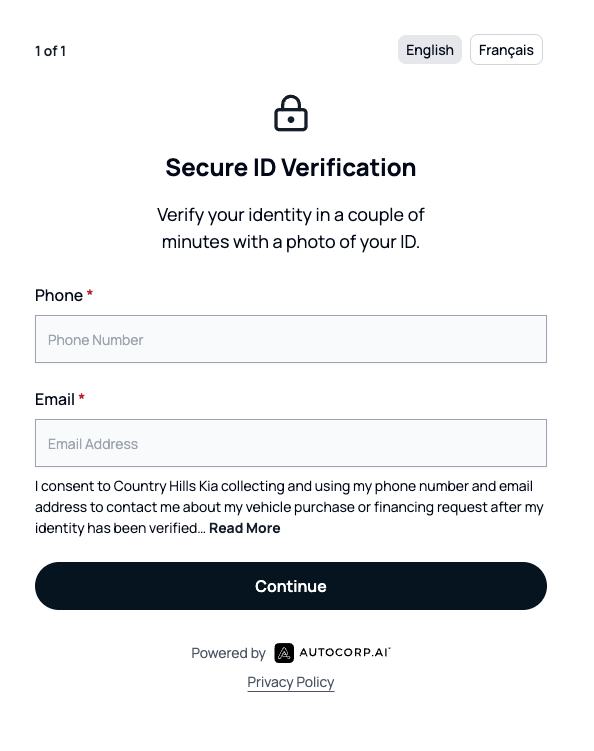
The first screen asks for a phone number and email address, with a consent statement naming your dealership. The customer must complete this before the scan begins.
Step 3 — The customer completes the standard verification
Front and back of the government ID, then a three-pose selfie for the biometric check.
Step 4 — The lead lands in the AVA® Portal
The record includes the name, address, and date of birth pulled from the ID, alongside the phone number and email the customer entered.
Step 5 — Follow up
Call or email directly, or add the lead to an SMS campaign for credit or trade.
What You Can Expect
- A reachable record for every completed verification, not just a confirmed identity.
- A way to re-engage customers who verified, looked, and went quiet.
- Fewer manual re-keys, since contact details arrive with the verification rather than being typed in afterward.
Common Questions
The customer’s verification failed and they retried. Does that create a duplicate lead?
No. A retry returns the customer to the first screen, but any new attempt is linked to the existing lead rather than creating a second one.
Are phone and email required?
Yes. Both are collected before the scan begins, and the customer consents to being contacted about their vehicle purchase or financing request.
Does this change the ID verification itself?
No. The scan and selfie steps are the same, using whichever verification template your store is already configured for.
Can we switch back to standard AVA® ID?
Yes. The variation is set on your company profile — contact your Autocorp.ai representative or support.
Pro Tips
- Tell the customer why you are asking before you hand over the phone. "So we can send your paperwork and any updates" lands better than silence.
- Treat a verified-but-quiet lead as a warm one. They stood in your showroom and handed over their ID.
Need Help?
Chat inside your AVA® Portal
support@autocorp.ai
1 (877) 255-8627